0x01 Fail2ban是什么?
Fail2ban 是一款使用软件,可以监视你的系统日志,然后匹配日志的错误信息(正则匹配)
执行相应的屏蔽动作。
0x02 Fail2ban安装
#安装fail2banyum -y install fail2ban#配置cp /etc/fail2ban/jail.conf /etc/fail2ban/jail.localvim /etc/fail2ban/jail.local#修改需要的策略,此处以sshd为例
[sshd]# To use more aggressive sshd modes set filter parameter "mode"in jail.local:# normal (default), ddos, extra or aggressive (combines all).# See "tests/files/logs/sshd" or "filter.d/sshd.conf"for usage example and details.#mode = normalport = 2202#sshd使用端口logpath = %(sshd_log)sbackend = %(sshd_backend)smaxretry = 5enabled = true
#查看fai2ban状态fail2ban-client status#查看配置策略sshd状态fail2ban-client status sshd#手工解除fail2ban中被拉黑ipfail2ban-client set sshd unbanip xx.xx.xx.xx
0x03 配置Fail2ban邮件通知
#查看未被#注释的行egrep -v "^#|^$"/etc/fail2ban/action.d/mail-whois.conf#修改/etc/mail.rc文件,添加如下邮件账号密码信息# For Linux and BSD, this should be set.set bsdcompatset from=xxx@xxx.comset smtp=smtp.xxx.comset smtp-auth-user=xxx@xxx.comset smtp-auth-password=xxxxxset smtp-auth=login#测试邮件发送echo "邮件内容".|mail -v -s "邮件标题" xxx@xxx.com#如提示命令未找到需安装sendmail,默认centos自带安装yum -y install sendmail mailx jwhois#查看sendmail状态,如错误systemctl status sendmail
0x04 配置Fail2ban telegram 机器人通知
#创建Telegram 机器人为关注`Botfather`,按提示操作即可,#可查找机器人Token,添加`userinfobot`查找自己聊天ID#在/etc/fail2ban/action.d/中新建telegram.conf文件并写入[Definition]actionstart = /etc/fail2ban/scripts/send_telegram_notif.sh -a startactionstop = /etc/fail2ban/scripts/send_telegram_notif.sh -a stopactioncheck =actionban = /etc/fail2ban/scripts/send_telegram_notif.sh -n <name> -b <ip>actionunban = /etc/fail2ban/scripts/send_telegram_notif.sh -n <name> -u <ip>[Init]init = 123
#在/etc/fail2ban/中新建scripts目录,并新增send_telegram_notif.sh脚本文件写入#!/bin/bash# Version 1.0# Send Fail2ban notifications using a Telegram Bot# Add to the /etc/fail2ban/jail.conf:# [sshd]# ***# action = iptables[name=SSH, port=22, protocol=tcp]# telegram# Create a new file in /etc/fail2ban/action.d with the following information:# [Definition]# actionstart = /etc/fail2ban/scripts/send_telegram_notif.sh -a start# actionstop = /etc/fail2ban/scripts/send_telegram_notif.sh -a stop# actioncheck =# actionban = /etc/fail2ban/scripts/send_telegram_notif.sh -n <name> -b <ip># actionunban = /etc/fail2ban/scripts/send_telegram_notif.sh -n <name> -u <ip>## [Init]# init = 123# Telegram BOT TokentelegramBotToken='xxxxx'#此处替换为自己Telegram 机器人Token# Telegram Chat IDtelegramChatID='xxxxx'#此处替换为自己的Chat IDfunction talkToBot() {message=$1curl -s -X POST https://api.telegram.org/bot${telegramBotToken}/sendMessage -d text="${message}"-d chat_id=${telegramChatID} > /dev/null 2>&1}if[ $# -eq 0 ]; thenecho "Usage $0 -a ( start || stop ) || -b $IP || -u $IP"exit 1;fiwhile getopts "a:n:b:u:" opt; docase"$opt"ina)action=$OPTARG;;n)jail_name=$OPTARG;;b)ban=yip_add_ban=$OPTARG;;u)unban=yip_add_unban=$OPTARG;;?)echo "Invalid option. -$OPTARG"exit 1;;esacdoneif[[ ! -z ${action} ]]; thencase"${action}"instart)talkToBot "Fail2ban has been started on `hostname`.";;stop)talkToBot "Fail2ban has been stopped on `hostname`.";;*)echo "Incorrect option"exit 1;;;esacelif[[ ${ban} == "y"]]; thentalkToBot "[${jail_name}] The IP: ${ip_add_ban} has been banned on `hostname`."exit 0;elif[[ ${unban} == "y"]]; thentalkToBot "[${jail_name}] The IP: ${ip_add_unban} has been unbanned on `hostname`."exit 0;elseinfofi
#给send_telegram_notif.sh脚本添加可执行权限chmod +x send_telegram_notif.sh#修改jail.local配置文件,将启用的jail的action下添加一个telegram,如下action = iptables[name=SSH,port=2202,protocol=tcp]telegram#重启fail2ban验证systemctl restart fail2ban
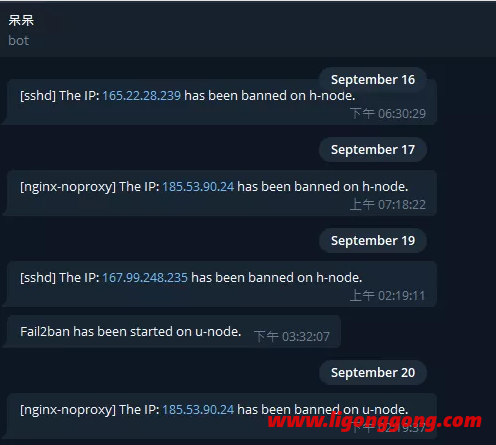
Telegram 机器人告警通知效果如图
0x05 fail2ban 配置文件字段说明
-
如需开启服务,在配置文件中指定服务中添加enabled=true开启 -
1.ignoreip:永远不会被禁止的IP地址白名单。他们拥有永久的“摆脱Jails”卡。 -
该本地主机的IP地址 (127.0.0.1)是在列表中默认情况下,其IPv6相当于沿(::1)。 -
如果您知道永远不应禁止其他IP地址,请将它们添加到此列表中,并在每个IP地址之间留一个空格。 -
2.bantime:禁止IP地址的持续时间(“ m”代表分钟)。 -
如果键入的值不带“ m”或“ h”(代表小时),则将其视为秒。值-1将永久禁止IP地址。 -
要非常小心,不要将自己永久锁定在自己的面前。 -
3.findtime:尝试失败的连接次数过多会导致IP地址被禁止的时间。 -
4.maxretry:“尝试失败次数过多”的值。 -
如果来自同一IP地址的maxretry连接在该findtime时间段内尝试失败的连接,则在持续时间内将其禁止bantime。 -
唯一的例外是ignoreip列表中的IP地址。 -
Fail2Ban将IP地址放入Jails一段时间。fail2ban支持许多不同的Jails,每个Jails代表适用于单个连接类型的设置。 -
这使您可以对各种连接类型进行不同的设置。或者,您可以Fail2Ban仅监视一组选定的连接类型。


评论前必须登录!
注册